Chords are one of the first things a beginner guitarist learns. Chords are a bunch of notes played together; and depending on the relations among the notes determine the quality of the chords. Although there are thousands of chords out there, beginners need to master only eight open chords first.
This article explains how you play these eight basic open chords along with two more chords that are not necessarily open chords but sound great.
10 Basic Chords
Take note that each horizontal line represents a string and space between two vertical lines represents a “fret.” And also, the first string (the high e string) is denoted by the top horizontal line. Additionally, guitarists also associate numbers to their fretting hand fingers. The index finger is called the 1st finger, the middle finger is the 2nd, the ring finger is the third and the pinky is the forth. And, the cross mark (X) in a diagram means that the crossed string or strings will not be played with that chord.
A Major

This is a fairly easy chord to hold. All the notes are held on the 2nd fret with the 2nd, 3rd and 4th finger on 4th, 3rd and 2nd string respectively. You will often encounter players who play open A major chord with their 1st, 2nd and 3rd finger as well. This depends on your personal preference or the song you are playing, so, if possible, learn it both ways. The low E string or the 6th string is muted while playing A Major chord, be mindful about that.
A Minor

A minor is also a beginner friendly chord. Notice how this chord differs from A major by only one note (as this is the case for any major and minor chord in the same key). While playing this chord, the 1st finger on the 2nd string often comes in contact with the 1st string and inadvertently doesn’t let the 1st string create a clear sound. You have to be careful about this. Like A major, A minor chord also played with muted 6th string.
C Major
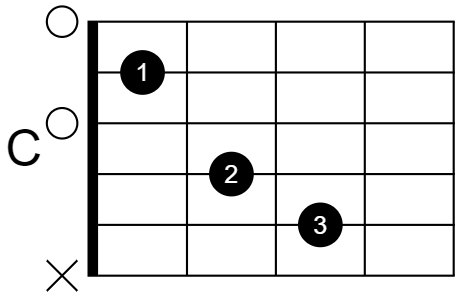
C Major is one of the most challenging open chords. You do need to stretch quite a lot and if you are a beginner, you still might not have the dexterity and strength required to hold and play this chord. On top of that the open 3rd and 1st string might produce a buzz noise due to incorrect placement of your 2nd and 1st finger respectively. A helpful trick to nail challenging chords, like C major, is to place one finger at a time on the strings.
Here is how to execute that.
The Trick:
Without holding any notes, strum all the strings with a steady rhythm. Now, for C major, place your first finger on the second string; keeping the steady rhythm in your strumming hand, place your 2nd and 3rd finger on the 4th and 5th string one at a time. After placing all the fingers, check for any string or fret buzz by playing all the strings one by one. And repeat the whole process as much as you can. This will help your fingers develop the necessary muscle memory to hold a chord.
E Major
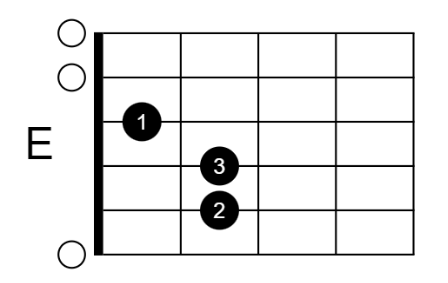
E major is similar to A minor in terms of the shape. You will understand why this is true in due time, so don’t worry about it now. E major is also easier to hold than , say, C major or G major. You don’t need to mute any strings to play this chord. Although this chord is considered to be an “easy-to-hold” chord, if you face any difficulty in playing this one, you can always utilize the trick I discussed for C major chord.
E minor

Undoubtedly, the easiest of the open chords is E minor. You will be able to play it in no time, I can vouch for that. You can use any two adjacent fingers to hold this chord, I showed the most common fingering of this chord. Once again, care should be taken, while playing this chord as the finger on the 4th string might mute the 3rd string below.
D Major

D Major has a triangular shape, this should be easy to remember. Surprisingly, beginners often forget this chord shape. You can use your 2nd, 3rd and 4th finger to hold it as well and you should practice this fingering after mastering the given fingering.
D major might pose a problem at first, as the fingers are much closer to each other, similar to A Major. However, with diligent practice, you will get a hold of it in no time.
Another key thing here is the muted 6th and 5th strings. These two strings should be muted, if the song you are playing doesn’t require you to play those strings.
D minor
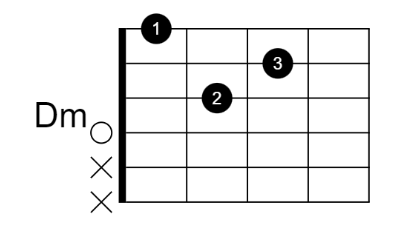
D minor is one of the most common chords used in rock, blues, jazz, country and pop. Many scales ( that are commonly played, as they are much easier to play on a guitar) includes D minor among the chords that can be built from them.
Make sure to mute the bottom two strings, as they are generally played this way. Although this chord has notes that are much closer to each other than many other chords, the stretch between 1st and 3rd finger might give you a hard time. To get around this issue, practice this chord using the trick from the very beginning.
G Major

G major, along with C major, is one of the most difficult chords to play. For G Major you have to utilize all four fingers of your fretting hand. And this proves to be difficult for beginners.
G major is also one of the most used chords, so you have to learn it. Using the trick in your practice , you can somewhat minimize the difficulty. Take special care in placing your 3rd and 4th fingers, as they are often the weaker among the fingers.
The following two chords are not necessarily open chords, but, these are beautiful chords that a beginner will love to play. These chords are also moveable, unlike the open chords. Moveable means these chords can be shifted up or down the fretboard and they will retain the same chord quality but in a different key. Take, for example, a Cmaj9 chord, if you move all the notes up by a semitone i.e. by one fret, it will still be a maj9 chord but this time it will be called a Dbmaj9 chord instead.this means using one shape you can play any maj9 chord.
Cmaj9
This might look intimidating for beginners and it also requires that it be played with all four fingers, but the ethereal beauty of this chord is worth the effort.
The position of the 3rd and the 4th finger will be a challenge for anyone who lacks the finger dexterity. But, take this chord as an exercise for your finger dexterity, since this chord will stretch your fingers quite a bit.
Cm9

Another mesmerizing chord that you can use in place of the basic minor chord, it will sound wonderful.
The difficulty of holding this chord comes from the fact that all four notes are really close to each other. Your 3rd and 4th finger will struggle to press the strings with enough strength. You can start by pressing any or two notes first and then place the remaining two fingers.
Final Words
In closing, I should remind you that the key to master any guitar skill is to play at a slower speed. This will help you notice the mistakes that your fingers make and avoid forming bad playing habits. In that note, I hope you get through the difficulties in mastering chords and get to enjoy your own amazing guitar playing.